I am so happy to share with you two of the newest features that have been integrated to the Microsoft Loop: Ability to create Loop components in Microsoft Teams Channels and in Microsoft Whiteboard. If you are not familiar with Microsoft Whiteboard, it is a Microsoft app that lets you collaborate with others on an infinite canvas, where you can draw / ink, write, insert images, stickers, use templates, and more. I assume Microsoft Teams and Loop are at least familiar to readers. 😊
- Loop components in Microsoft Teams channels
- Whiteboard Loop components
- Loop component storage locations
- Conclusion
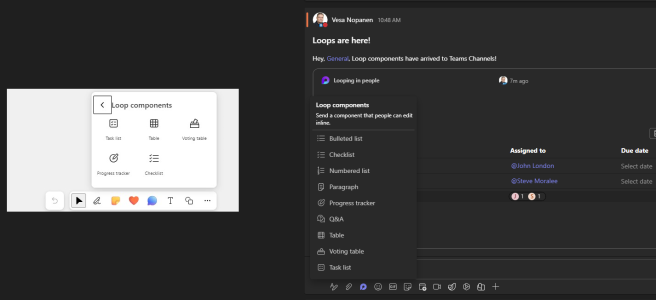
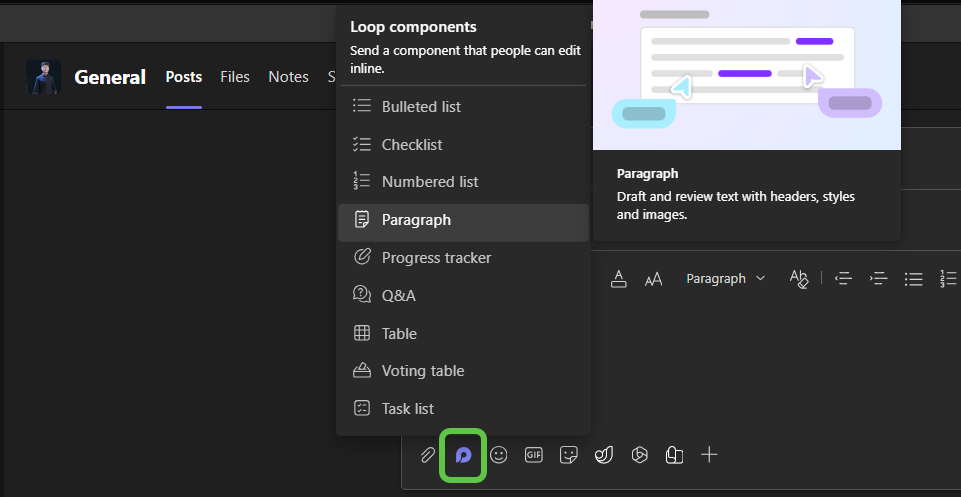
Loop components in Microsoft Teams channels
This is something that a lot of people have been waiting for with much anticipation. Ability to add Loop components for channel messages serves two primary purposes:
- Collaborating in channel using Loop components for details and keeping the conversation going in Teams without having to context switch
- Components created in channels are stored in teams’ files and thus everyone in the team has access to them. For some this alone is the purpose since storage on OneDrive has been seen causing potentially issues when / if people leave the company.
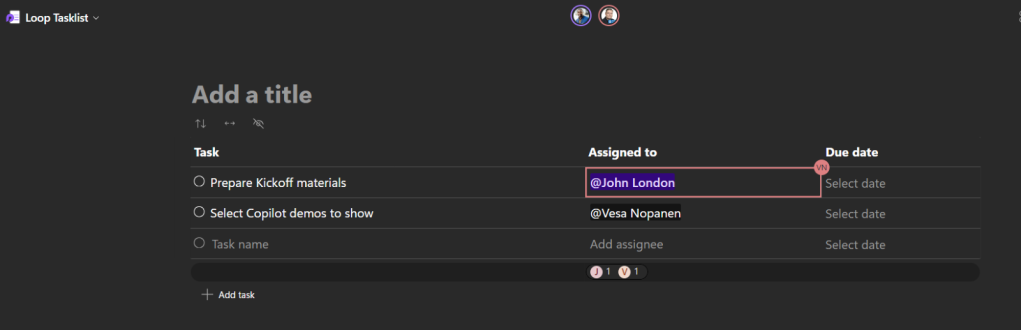
When a new component is created, you can edit its content just like in Teams chats.
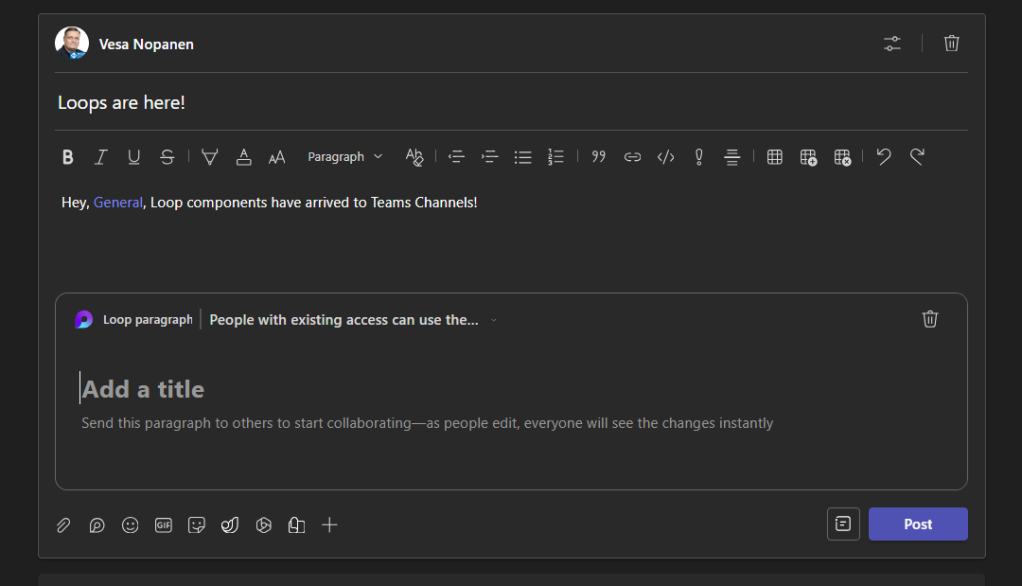
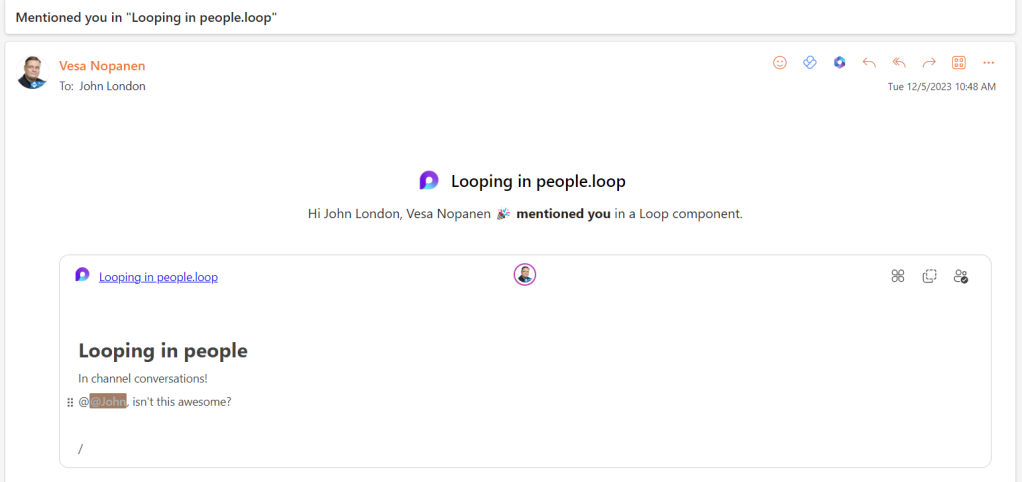
You can also include title and message with the component, so they are not separated from the context but stay with the conversation thread. You can atmention people in the team since they have access to the component automatically.
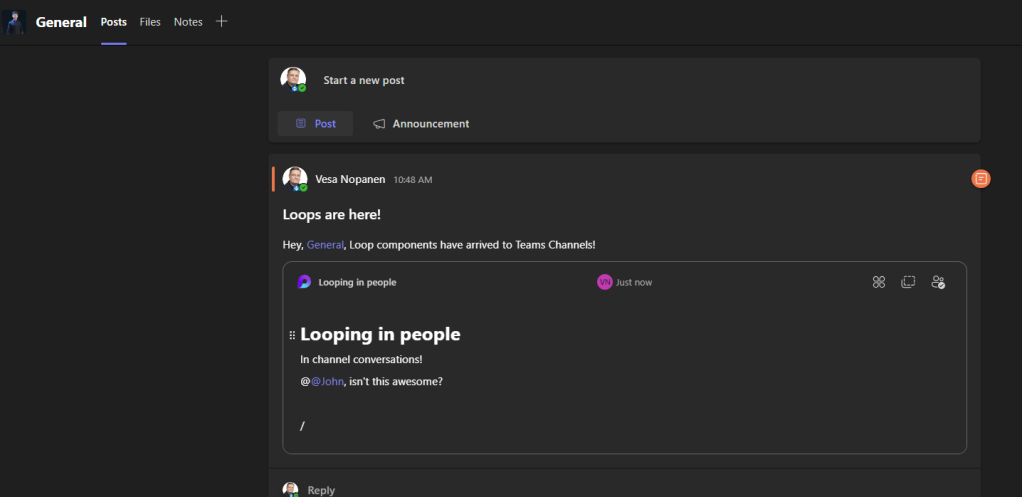
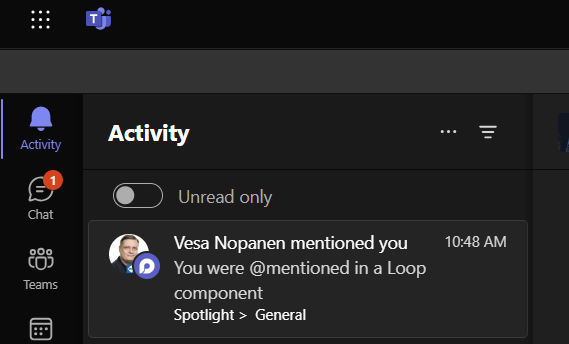
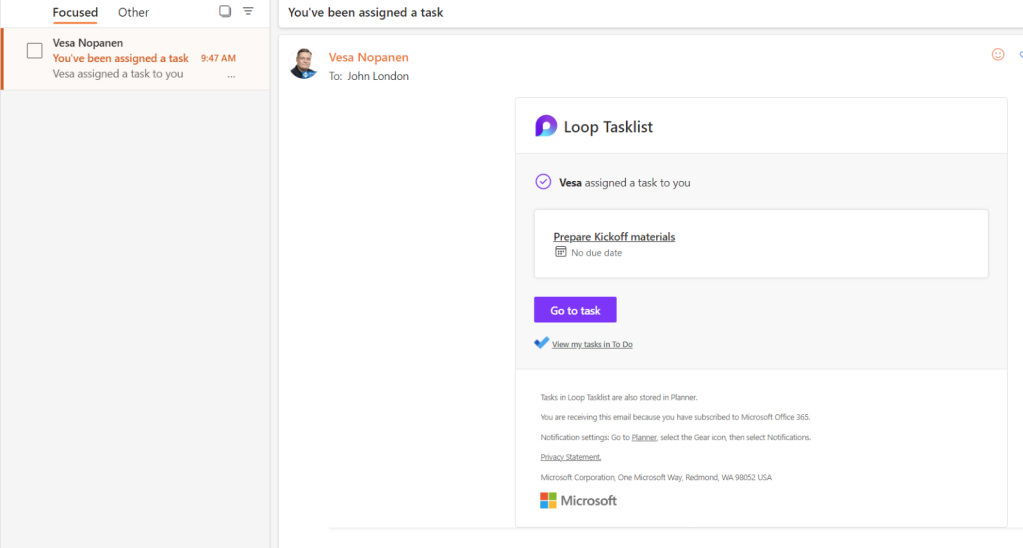
John gets a notification in the Teams activity feed and in his email.
The email also lets John edit the Loop component content directly at Outlook.
It is also easy to add new Loops to the component from anywhere the component is used. Just like normally.
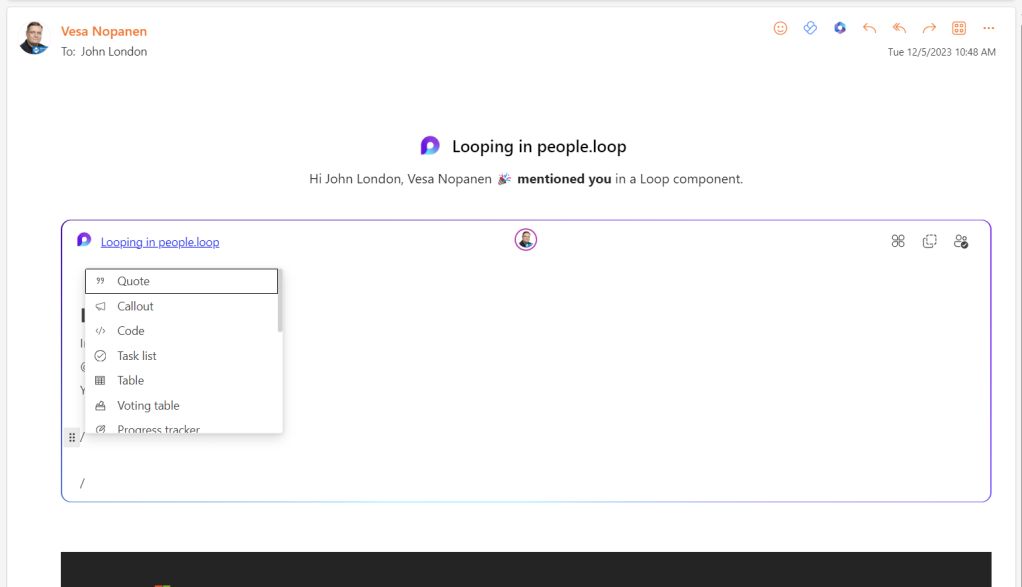
In case you feel that the inserting new Loop component list is too short, and you need to scroll a lot, refresh the channel (or if using web Teams refresh the tab) to make it reset to taller one. It is not as tall as I would like to (and it is in Loop app for example) but at least 5-7 components are seen when you scroll the list up and down.
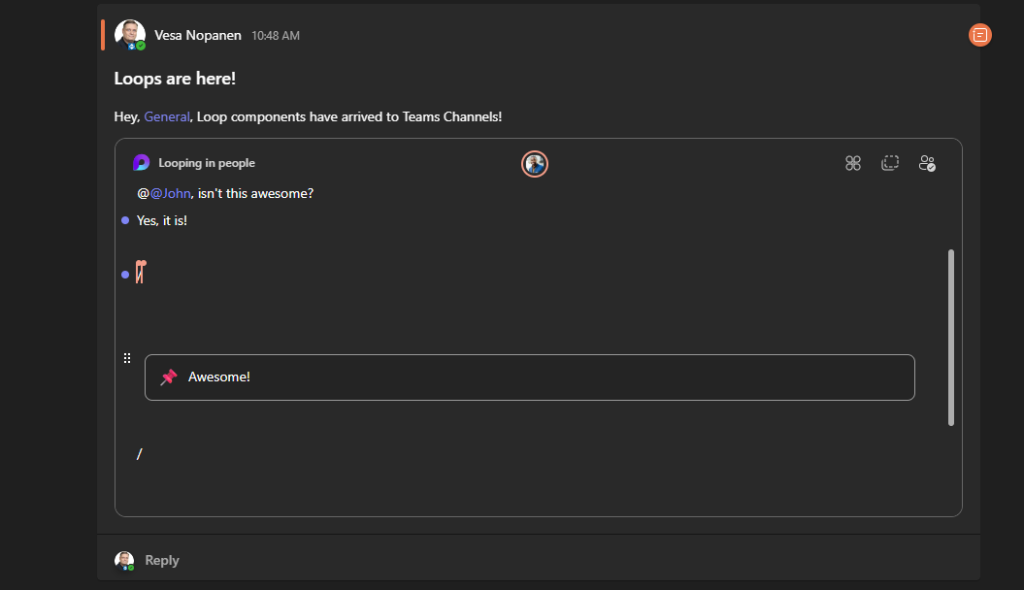
That red pin is called Callout and it can be found in the Loop component list when you hit / to add a new one.
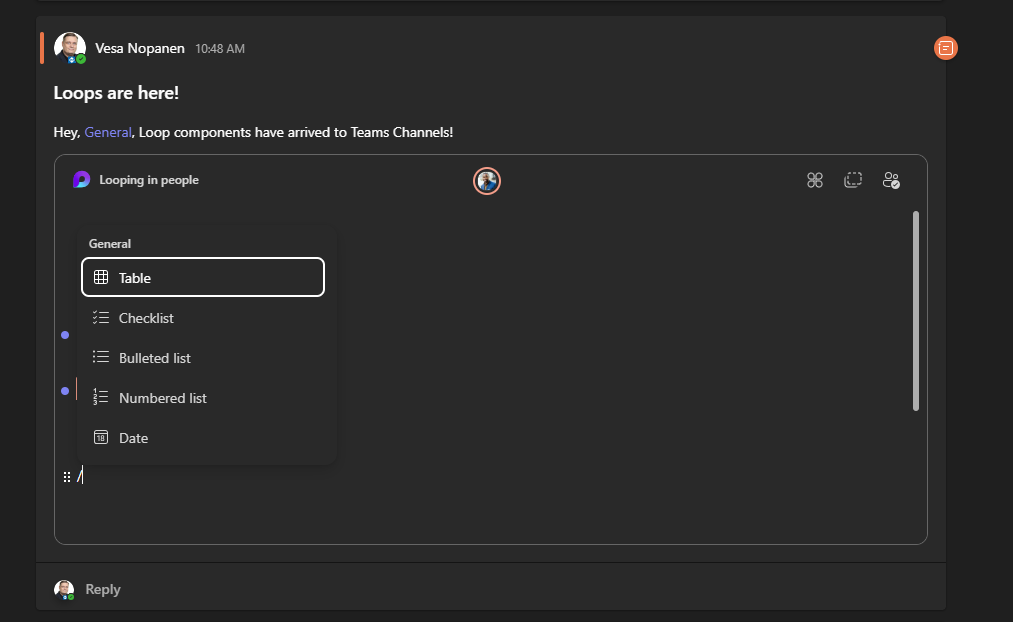
What is important, that now these Loop components are stored in the relevant team’s channel files.

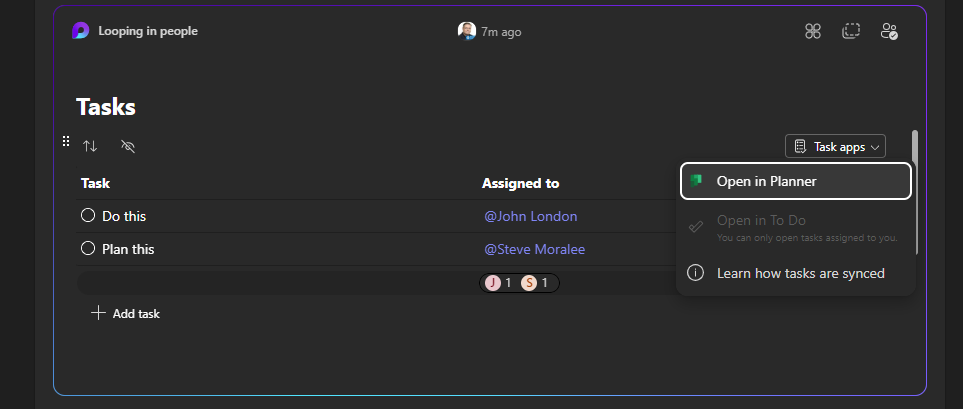
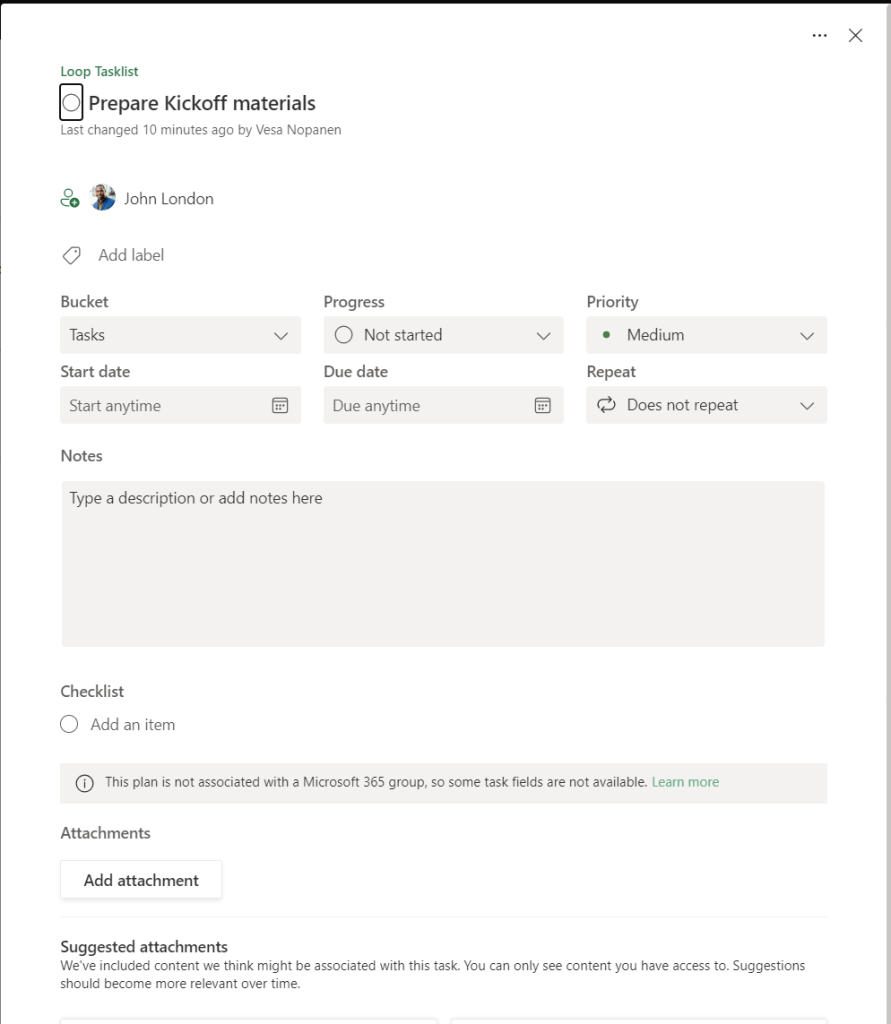
What about Tasks in Channel loop components? When you add a task list there, it will create a lightweight Planner board. This Planner is not, unfortunately, connected to the team’s Planner anyway – there is only Planner and Loop component connection. Thus, it is a separate Plan.
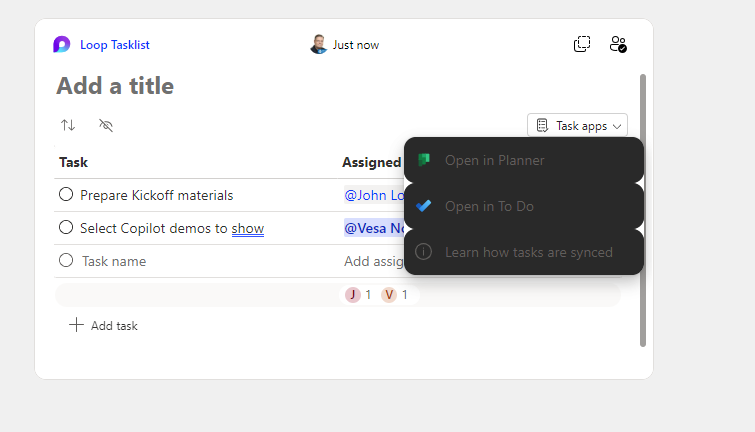
You can get to the Planner easily, by using the Task apps menu on top right corner of the Tasks component.
Whiteboard Loop components
One of the coolest things about Microsoft Whiteboard is that it integrates with Microsoft 365 apps, such as Teams and Loop. Whiteboard got integrated to Microsoft Loop quite some time ago, but it was only possible to paste in components that were created somewhere else. You had to open Loop, Teams, Word or Outlook in a separate app, tab or window, create your component there, and then copy and paste it into your whiteboard. This was a bit cumbersome, especially if you wanted to use the Loop in the flow of work without switching the context.
Microsoft has recently updated Whiteboard to allow you to create Loop components directly from inside the app. This is something I have been waiting for personally for some time, and I am sure I am not alone. It makes the entire process of creating and adding Loop components much faster and smoother, and it opens new possibilities for enhancing your whiteboards with interactive and engaging content.
So, how do you create Loop components in Microsoft Whiteboard? Keep on reading!
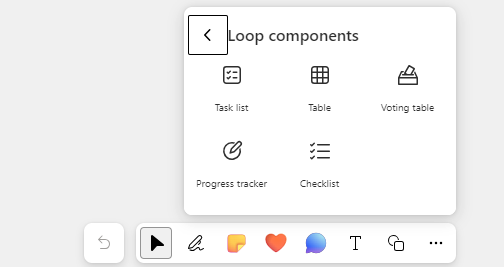
The way to create Loop components in the Whiteboard is something you just need to know – or bump into those by accident when you are adding images or videos to the board. They can be found under … menu in Whiteboard toolbar.

Whiteboard Loop components
When you open Loop components menu, you see it is possible to create following components
- Task list
- Table
- Voting Table
- Progress tracker
- Checklist
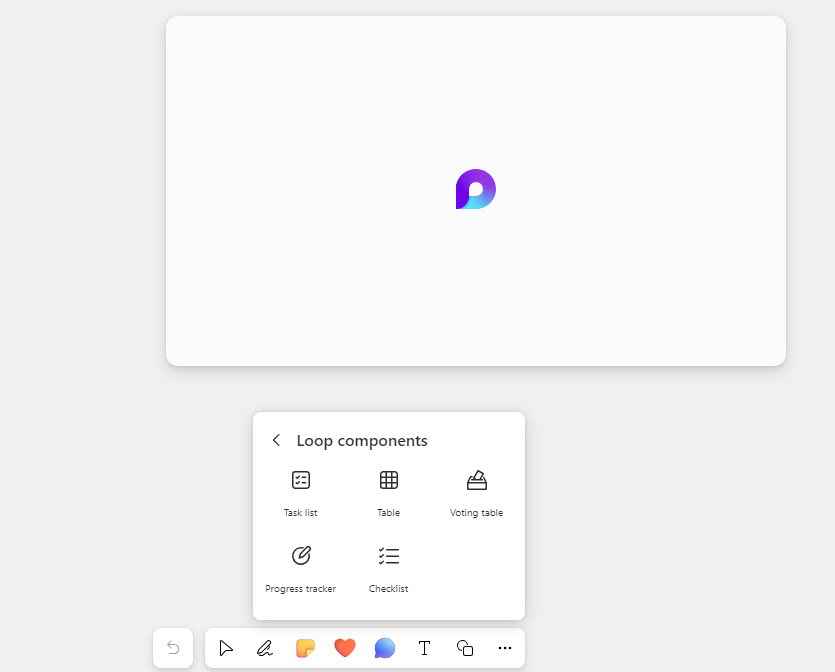
These are all familiar from Loop components before. When you select a component, you can choose where to drop it in Whiteboard canvas
For example, Task list is especially useful to collect tasks and who tasks are assigned to. This way you do not have to document tasks somewhere else.
Task Loop component

Adding tasks and people is easy. In case those persons are not already on the Whiteboard, you need to give them access to Loop component. This happens by clicking on their name in the component.
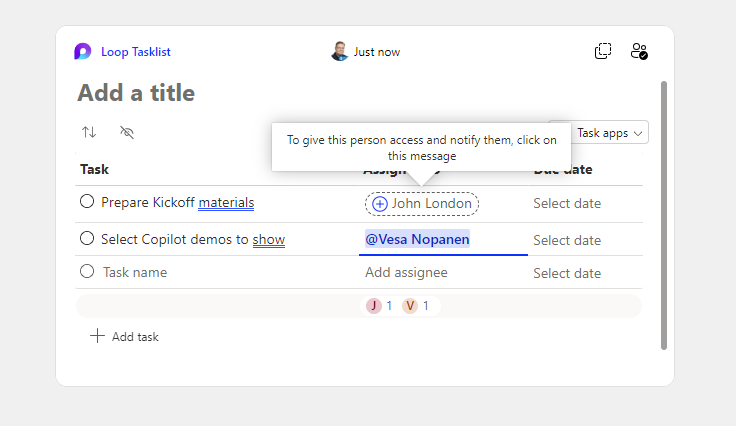
Clicking on the name opens access granting dialogue.
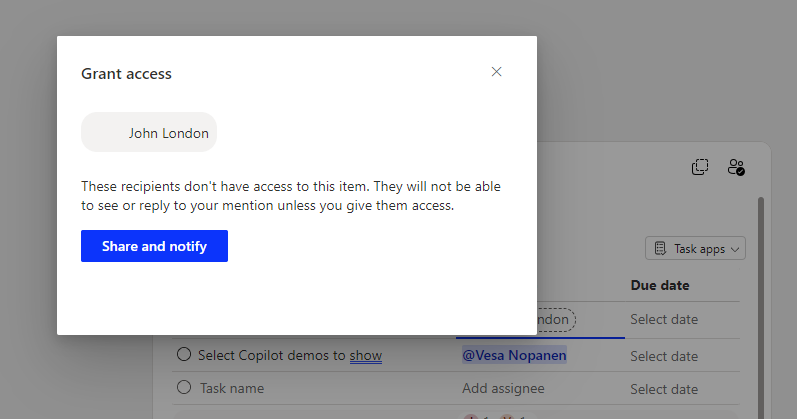
Just hit Share and notify, to enable them to collaborate with you. This does not share the Whiteboard, only the Loop component so they can see the task they have. They will get an email notifying them about the task they have been assigned to.
The Loop component in Whiteboard goes by the default name unless you give it a title.
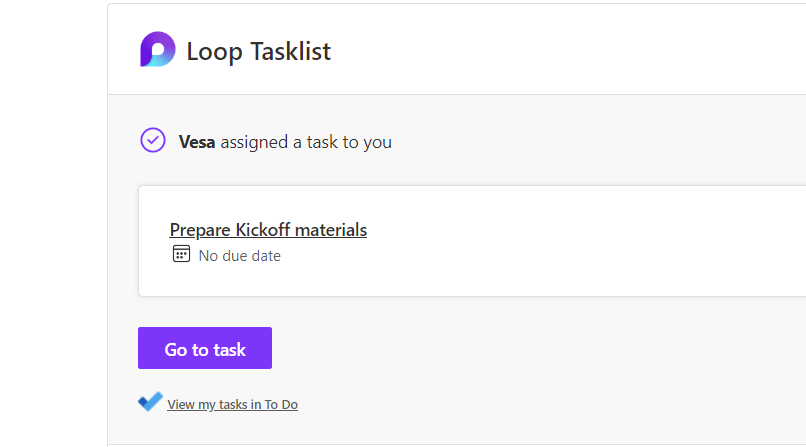
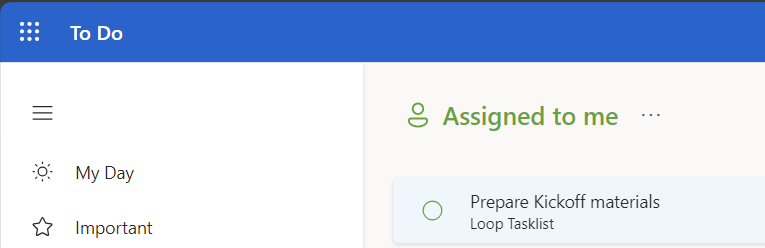
From the email user can jump directly to the Loop component (go to task) and below it can be seen “View my tasks in To Do”.
The Loop component opens in Loop app (if you have it in your licensing). This way John may not even have to get access to the Whiteboard if the task is descriptive enough. Overall, for the collaboration I would say the access to the Whiteboard is usually better than not.
What is great is that Loop component tasks end up also in To Do, so it is easy to keep track of tasks assigned to me – and their dates if they have one.
The task is connected to Planner
Tasks can be clicked done in any of these apps: To Do, Loop or Whiteboard and the information will synchronize automatically to all apps. In fact, every Loop Task component creates a planner board behind the scenes and To Do shows tasks from there.
The easiest way to get to Planner is to use Task Apps menu on top right corner of Tasks component. Dark theme is causing interesting effect in Whiteboard Loop Task component UI.
But you can find it also directly in Planner, where Loop Tasklist can be seen in the recommended planner boards.
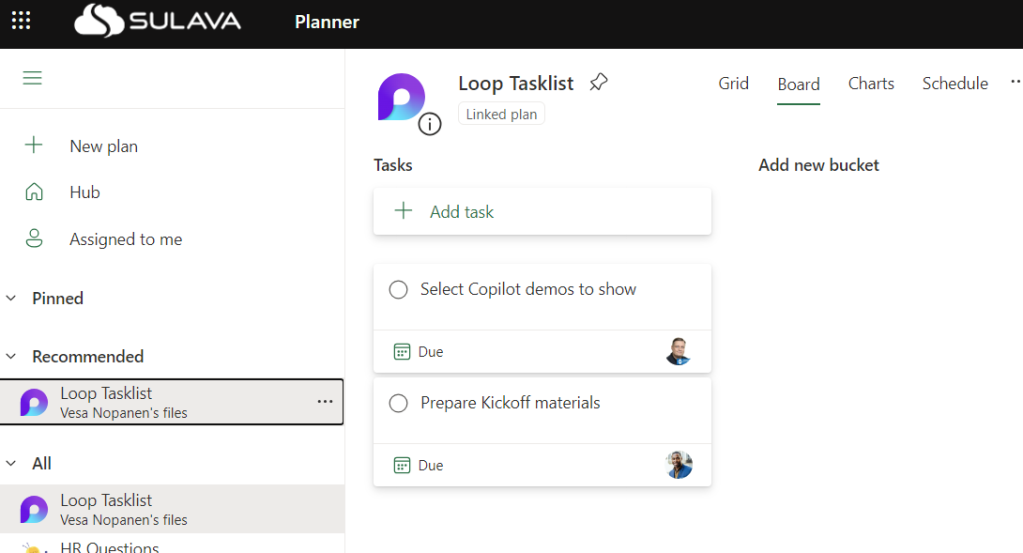
If there is a need to expand information to the task, it can be done via Planner. Yes, almost all Planner features are available. These boards are not connected to Microsoft 365 groups (or teams), so some features are missing.
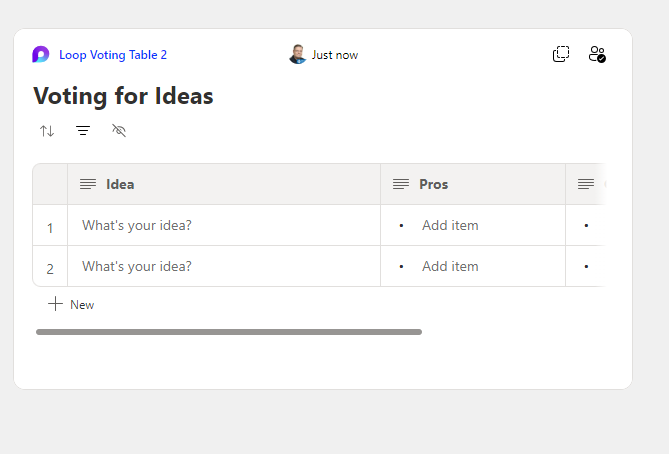
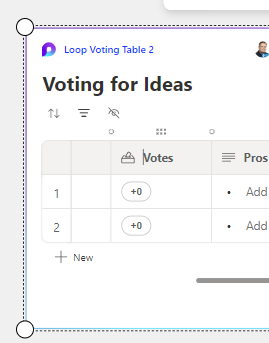
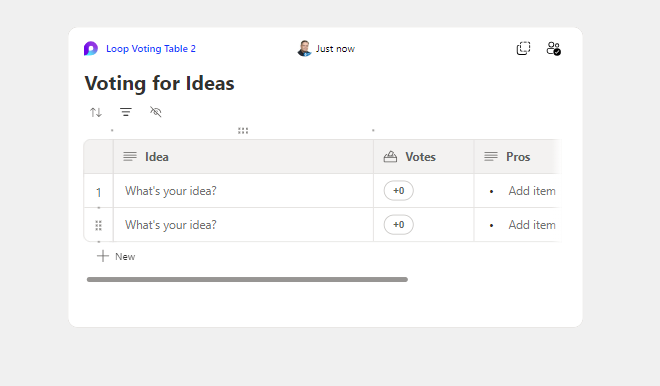
Voting table
Whiteboard is lacking in voting capabilities (notes can get reactions) and the new voting feature we have been waiting for has been pushed back in the roadmap to June 2024, so Voting table Loop component is super welcome. When you add a voting table you get the default view with Idea, Pros, Cons and Votes.
And you soon notice that if you try to make the component wider or more compact, it only largens / shrinks it. Cons and Votes columns are effectively hidden.
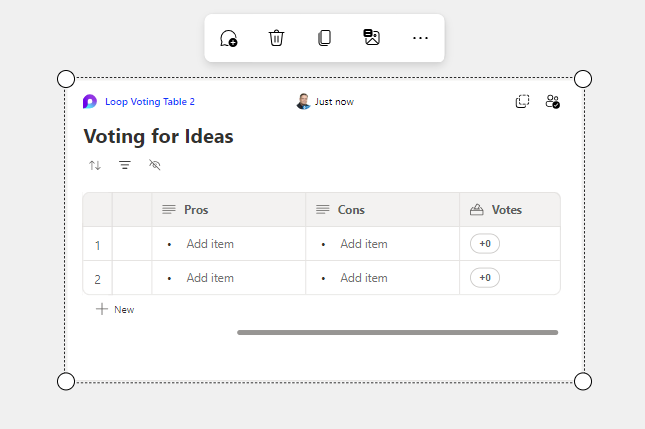
To make voting easy, it is best to drag the Voting column to be the second (or delete Pros and Cons columns). Dragging a column to a new location is the easiest way.
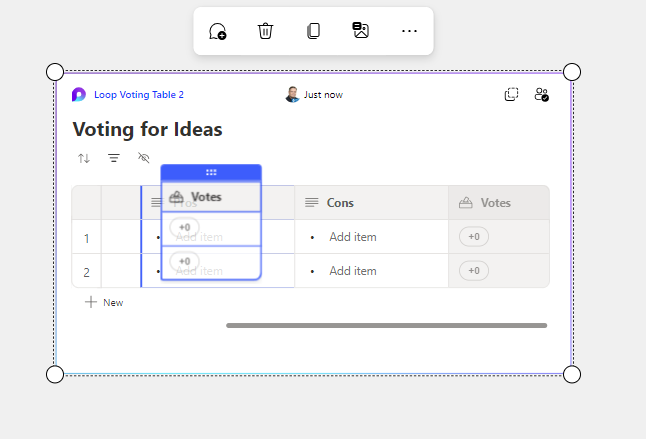
Just grab the column by that six dot (waffle) menu that is on top of column name.
After this, voting in Whiteboard is easy and since it is a Loop component, you can get and share it to other apps – and ask even for more votes.
Loop component storage locations
When a Loop component is created from within Whiteboard, it is always stored to creator’s OneDrive.
This is a new folder, compared to other Loop component storage locations in OneDrive.
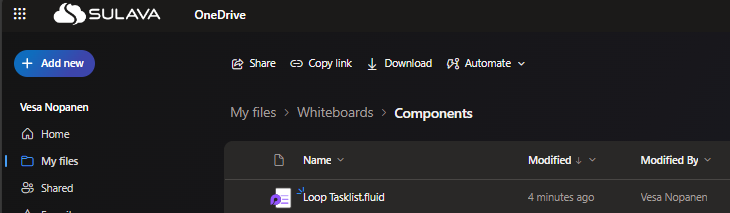
Loop components created in Whiteboard can be found in OneDrive under Whiteboards / Components folder.
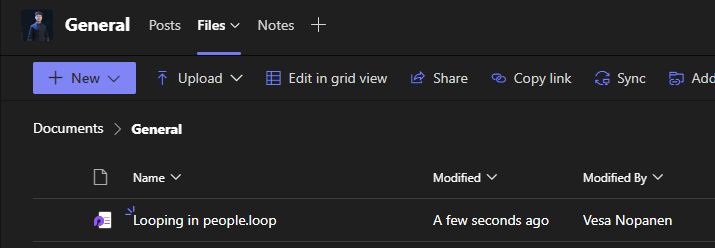
Other user created component location folders in OneDrive are
- Microsoft Teams Chat files (components created in Teams chats)
- Word Loop files (components created in Word)
- Attachments (components created in Outlook)
- Meetings (Teams meeting Collaborative meeting notes)
Everything created in the Loop application goes to Syntex Storage (SharePoint).
The new Loop Components created on Microsoft Teams channels go to files under the team – as they should. Collaborative meetings notes are not yet there for channel meetings, but I reckon these Loops will also end up in channel files.
Conclusion
In this blog post, you have seen some of the benefits and how to use Loop components in Teams channels and Microsoft Whiteboard. Loop components in Teams channels are truly a welcome addition, as they allow Looping in everyone in a team. And you can still add and edit those Loops via Loop App and other M365 apps.
Tasks and Voting table components in Whiteboard were also highlighted in detail. Other components there were a table, Progress tracker and checklist but I think Tasks and Voting tables will be, with the checklist, the most used ones in Whiteboard. I am not saying the remaining two are useless – far from it. There are different teams and needs, and it is great to be able to use them when needed.
Loop components are a powerful way to streamline and enrich our collaboration and creativity in Microsoft 365. If you have not gotten familiar with Microsoft Loop application yet… I suggest you start using it. It changed how I work big time.

3 thoughts on “How to create Loops in Microsoft Teams channels and in Whiteboard ”